Running sneakers are one of the most important investments for any runner. Whether you’re a casual jogger or a seasoned marathoner, keeping your sneakers clean and properly stored is crucial for maintaining their performance and extending their lifespan. Neglecting proper care can lead to premature wear, unpleasant odors, and even reduced support, which can impact your running experience. This guide will walk you through the best practices for cleaning and storing your running sneakers to keep them in top condition.
Why Cleaning and Storing Running Sneakers Matters
Running sneakers are exposed to various elements, including dirt, mud, sweat, and rain. Over time, these factors can cause materials to break down, leading to a decline in performance. Cleaning your sneakers regularly removes dirt and debris that can degrade the fabric and sole. Additionally, proper storage prevents unnecessary wear and protects them from environmental factors like moisture and extreme temperatures.
Ignoring sneaker maintenance can also result in bacterial growth and unpleasant odors, making your running sessions less enjoyable. By adopting a consistent cleaning and storage routine, you not only prolong the life of your sneakers but also ensure a more hygienic and comfortable running experience.
Steps to Clean Your Running Sneakers
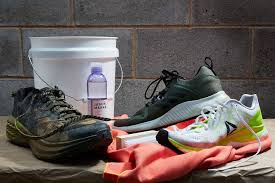
1. Gather the Necessary Supplies
Before you start cleaning, ensure you have the following items:
- A soft bristle brush or an old toothbrush
- Mild detergent or specialized sneaker cleaner
- A clean cloth or sponge
- Warm water
- A mesh laundry bag (optional)
- Baking soda (for odor removal)
Having the right tools on hand makes the cleaning process easier and more effective.
2. Remove Dirt and Debris
Begin by knocking off loose dirt and debris from your sneakers. Use a soft bristle brush or an old toothbrush to scrub the outsole and midsole gently. Pay special attention to grooves and textured areas where dirt tends to accumulate. This step prevents dirt from embedding deeper into the fabric during the cleaning process.
3. Take Out the Insoles and Laces
Remove the insoles and laces before cleaning the sneakers. This allows you to clean each component thoroughly and ensures better airflow when drying. Wash the laces separately by soaking them in a mixture of warm water and mild detergent. For the insoles, use a damp cloth and a small amount of detergent to wipe away sweat and odor causing bacteria. If they’re particularly smelly, sprinkle baking soda on them and let it sit overnight before wiping them clean.
4. Clean the Uppers
Mix a small amount of mild detergent with warm water to create a soapy solution. Dip a clean cloth or sponge into the solution and gently scrub the upper part of the sneakers. Avoid submerging your shoes in water, as this can damage the materials and adhesives. Focus on stained or dirty areas, using circular motions to lift grime effectively.
5. Rinse and Dry
After cleaning, use a damp cloth to wipe away any soap residue. Stuff the shoes with newspaper or paper towels to help them retain their shape and absorb excess moisture. Place the sneakers in a well ventilated area to air dry. Avoid direct sunlight or heat sources like radiators, as they can warp the materials and reduce the shoes’ durability.
Tips for Storing Running Sneakers
1. Store in a Cool, Dry Place
Moisture and heat are two of the biggest enemies of running sneakers. Store your shoes in a cool, dry place away from direct sunlight and humidity. A closet or shoe rack in a temperature controlled environment is ideal. If you live in a humid area, consider using silica gel packs or moisture absorbing inserts to keep your shoes dry.
2. Avoid Crushing or Piling
Avoid stacking heavy items on top of your sneakers, as this can distort their shape and affect their fit. Instead, store them upright or in a dedicated shoe organizer. If you’re short on space, consider using shoe bags or boxes to protect them from dust and dirt.
3. Rotate Your Shoes
If you run frequently, it’s a good idea to rotate between two or more pairs of running sneakers. This allows each pair to fully dry and recover between runs, reducing wear and tear. Rotating your shoes also ensures that you have a backup pair ready when one needs cleaning or repair.
4. Use Shoe Trees or Inserts
To maintain the shape of your sneakers, use shoe trees or supportive inserts when they’re not in use. These tools prevent creasing and help the shoes maintain their structural integrity over time.
Common Mistakes to Avoid
While cleaning and storing running sneakers may seem straightforward, there are some common pitfalls to avoid:
- Using Harsh Chemicals: Avoid bleach or strong detergents that can weaken the materials and cause discoloration.
- Machine Washing: While some sneakers may be labeled as machine washable, this method can damage delicate materials and adhesives. Hand cleaning is generally safer.
- Skipping Regular Cleaning: Allowing dirt and sweat to build up can make cleaning more difficult and accelerate wear.
- Drying with Heat: Never use a dryer or place your sneakers near a heat source to speed up drying. This can cause shrinkage and material breakdown.
How Often Should You Clean and Store Sneakers?
The frequency of cleaning and storage depends on how often you run and the conditions you encounter. For regular runners, a light cleaning after every few runs is sufficient to prevent dirt buildup. Deep cleaning can be done monthly or as needed. Proper storage should be a daily habit to ensure your sneakers are always ready for your next run.
Protect Your Investment
Running sneakers are more than just gear they’re an investment in your health and performance. By taking the time to clean and store them properly, you can extend their lifespan, maintain their functionality, and enjoy a more comfortable running experience. With these tips and techniques, your running sneakers will stay fresh, supportive, and ready to hit the road or trail whenever you are. Prioritize care, and you’ll maximize the value and performance of your beloved sneakers.